
Making a configurable widget for your iOS app
iOS, Swift, SwiftUI: Use WidgetKit and Siri Intent to make a configurable widget. User can select the city for a weather widget for example. User can long press and tap Edit Widget to edit the data, which is dynamically loaded.
In this article, we'll cover the following:
- Adding Widgets to an Existing Application
- ⭐️ Adding Configurable Widgets (e.g., user selects a city)
- Reloading Widgets
You can check out the completed source code here.
Adding Widgets to an Existing Application
Creating the Application Target
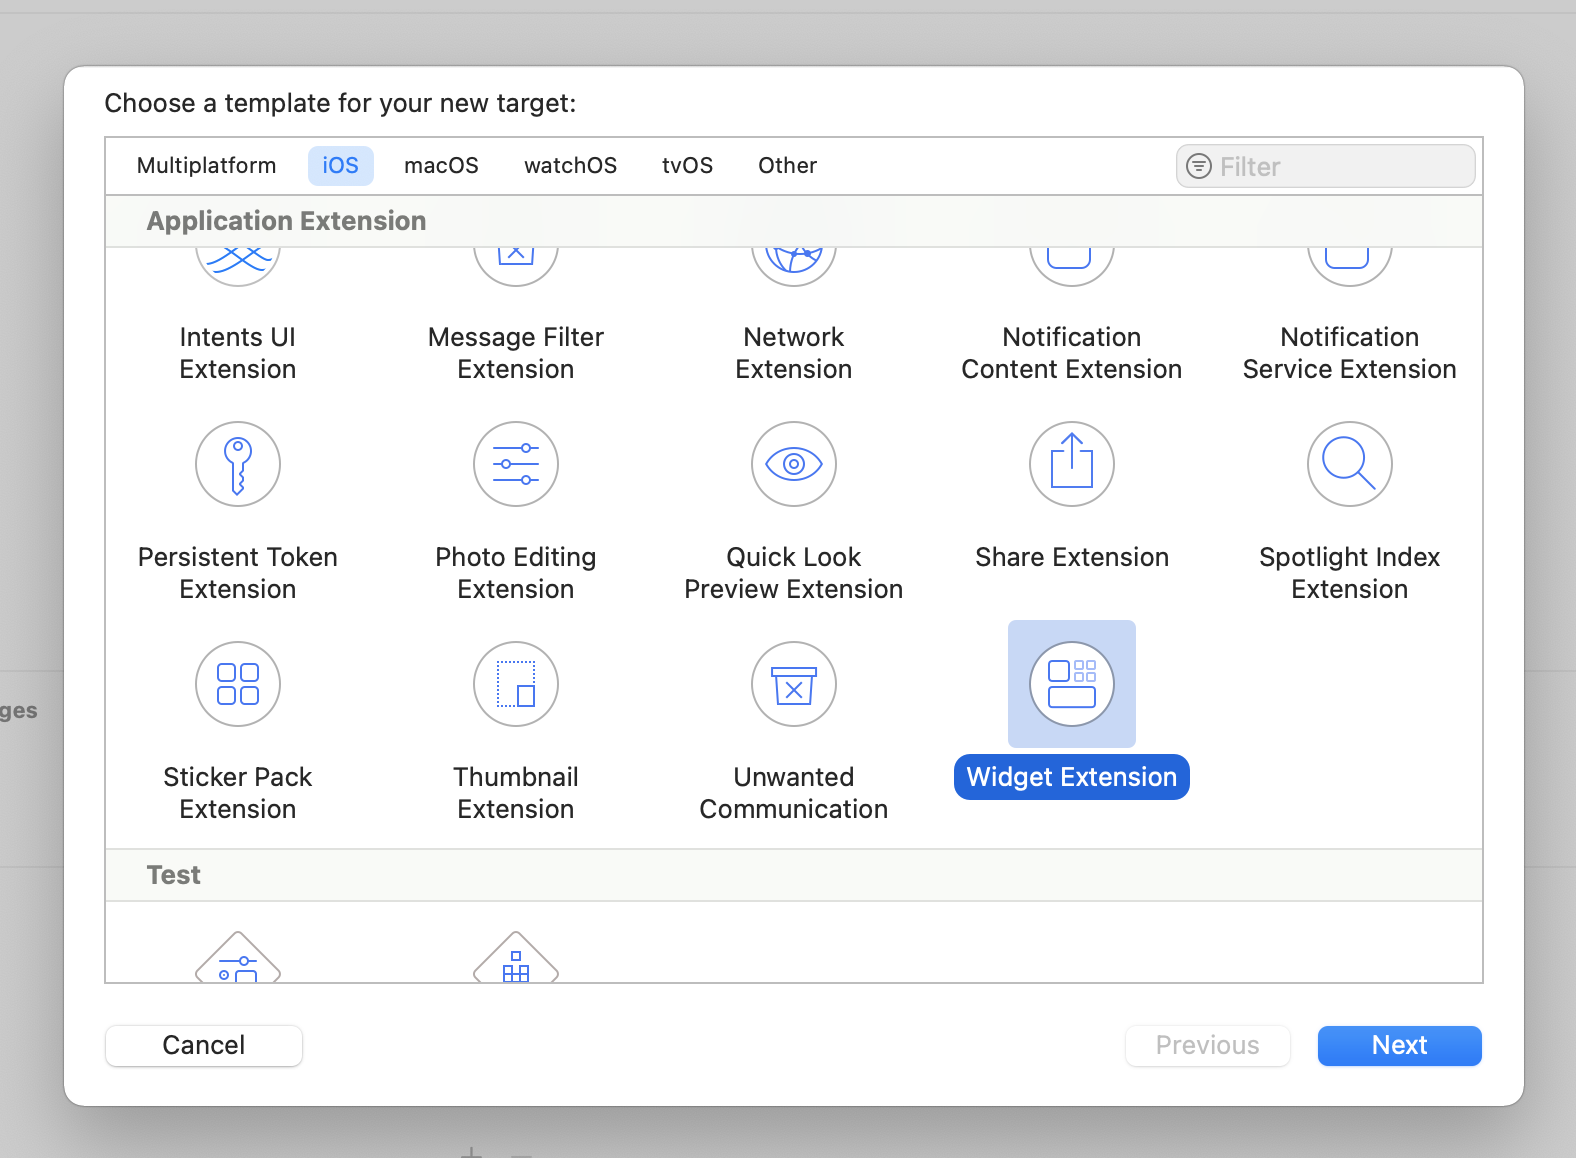
Adding a widget to an existing iOS application is simple. Add the target Widget Extension.
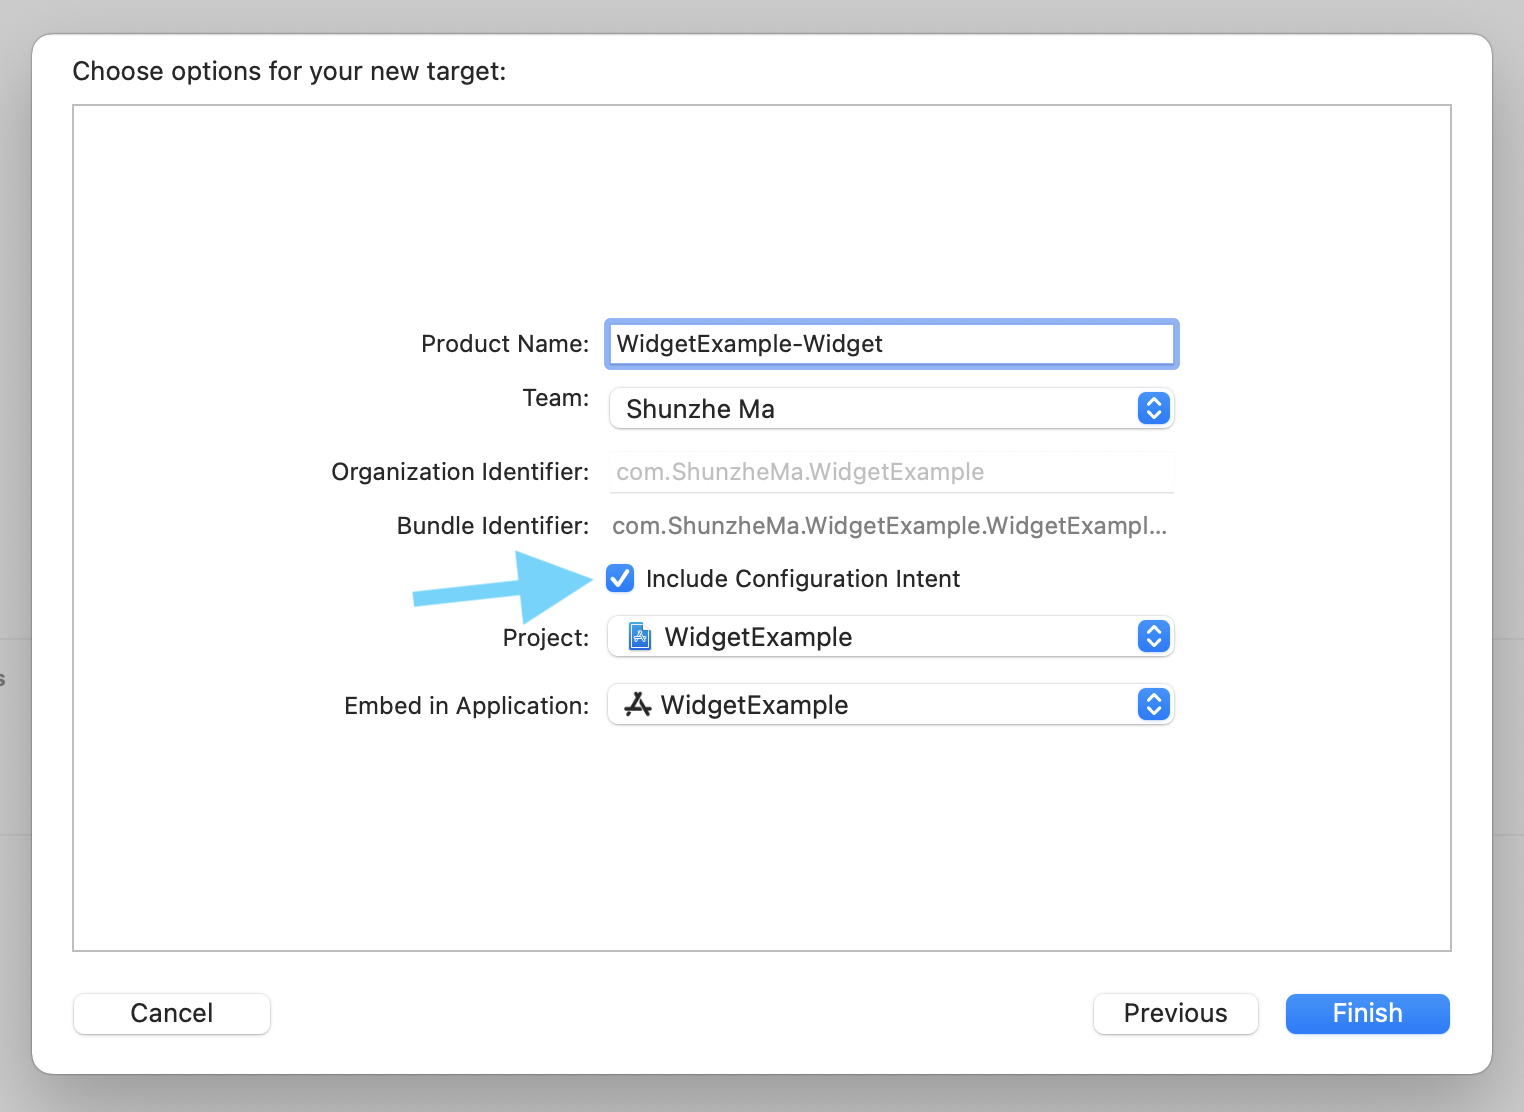
Now, make sure you have checked the Include Configuration Intent box. We'll need that configuration file in part 2 of this article.
Data Structure
You should now see a new folder named WidgetExample-Widget. Click to open the file WidgetExample_Widget.swift, delete its contents, and follow this guide.
You can create the data structure for the data you want to display in your widget. In this example, we'll display information about a cat!
struct CatEntry: TimelineEntry {
    var date: Date

    var name: String
    var lastFed: Date
    var lastPlayedWith: Date
}
Creating the IntentTimelineProvider Structure
The IntentTimelineProvider structure provides three types of content:
placeholderis displayed while the widget is loading.getSnapshotis shown in the widget gallery.getTimelineis used for the actual widget display.
First, create a struct conforming to the IntentTimelineProvider type, then define the type of Entry.
struct CatProviderStatic: TimelineProvider {
    typealias Entry = CatEntry

    func getSnapshot(in context: Context, completion: @escaping (CatEntry) -> Void) {
        //TODO
    }

    func getTimeline(in context: Context, completion: @escaping (Timeline<CatEntry>) -> Void) {
        //TODO
    }

    func placeholder(in context: Context) -> CatEntry {
        //TODO
    }
}
For the getSnapshot function, you can provide example values for the widget view to help users understand what information your widget will provide:
func getSnapshot(in context: Context, completion: @escaping (CatEntry) -> Void) {
    let entry = CatEntry(date: Date(), name: "Cat Name", lastFed: Date(), lastPlayedWith: Date())
    completion(entry)
}
For the placeholder view, you can display empty or example values:
func placeholder(in context: Context) -> CatEntry {
    return CatEntry(date: Date(), name: "Cat Name", lastFed: Date(), lastPlayedWith: Date())
}
For the timeline display, you can provide the actual content to be displayed.
In this example, we display static data values. In your application, you can fetch content from Core Data (see this article on how to share data), online, from CloudKit, or from UserDefaults.
func getTimeline(in context: Context, completion: @escaping (Timeline<CatEntry>) -> Void) {
    let entry = CatEntry(date: Date(), name: "Neko No Hī", lastFed: Date(), lastPlayedWith: Date())
    let timeline = Timeline(entries: [entry], policy: .atEnd)
    completion(timeline)
}
Adding Multiple Items to the Timeline
You can also add multiple items to the timeline. The widget will automatically check the timeline items and reload at the times indicated.
func getTimeline(in context: Context, completion: @escaping (Timeline<CatEntry>) -> Void) {
    var timelineEntries = [CatEntry]()
    if let date1 = Calendar.current.date(byAdding: .hour, value: 1, to: Date()) {
        let entry = CatEntry(date: date1, name: "Neko No Hī", lastFed: date1, lastPlayedWith: date1)
        timelineEntries.append(entry)
    }
    if let date2 = Calendar.current.date(byAdding: .hour, value: 2, to: Date()) {
        let entry = CatEntry(date: date2, name: "Neko No Hī", lastFed: date2, lastPlayedWith: date2)
        timelineEntries.append(entry)
    }
    let timeline = Timeline(entries: timelineEntries, policy: .atEnd)
    completion(timeline)
}
Designing the Widget View
Now, you can design the SwiftUI view for your widget.
struct CatWidgetView: View {

    @Environment(\.widgetFamily) var family

    var entry: CatEntry

    var body: some View {

        VStack {

            if family == .systemMedium || family == .systemLarge {
                Image("kitty")
                    .resizable()
                    .frame(width: 50, height: 50)
                    .padding(.vertical, 5)
            }

            Text(entry.name)
                .font(.headline)
                .padding(1)

            Text("Last played with at " + entry.lastPlayedWith.getString())
                .font(.caption)
                .padding(.horizontal)

            Text("Last fed at " + entry.lastFed.getString())
                .font(.caption)
                .padding(.horizontal)

        }

    }
}
You can use the @Environment(\.widgetFamily) var family variable to check the size of the widget.
In this example, we're displaying a cat image if the widget is large enough to fit the image.
if family == .systemMedium || family == .systemLarge {
    Image("kitty")
        .resizable()
        .frame(width: 50, height: 50)
        .padding(.vertical, 5)
}
Coding the Widget Application
Now, you can code the widget application.
@main
struct CatWidget: Widget {

    var body: some WidgetConfiguration {
        IntentConfiguration(kind: "CatWidget", intent: ConfigurationIntent.self, provider: CatProvider()) { entry in
            CatWidgetView(entry: entry)
        }.configurationDisplayName("Cat")
        .description("See when you last fed or played with your cat.")
    }
}
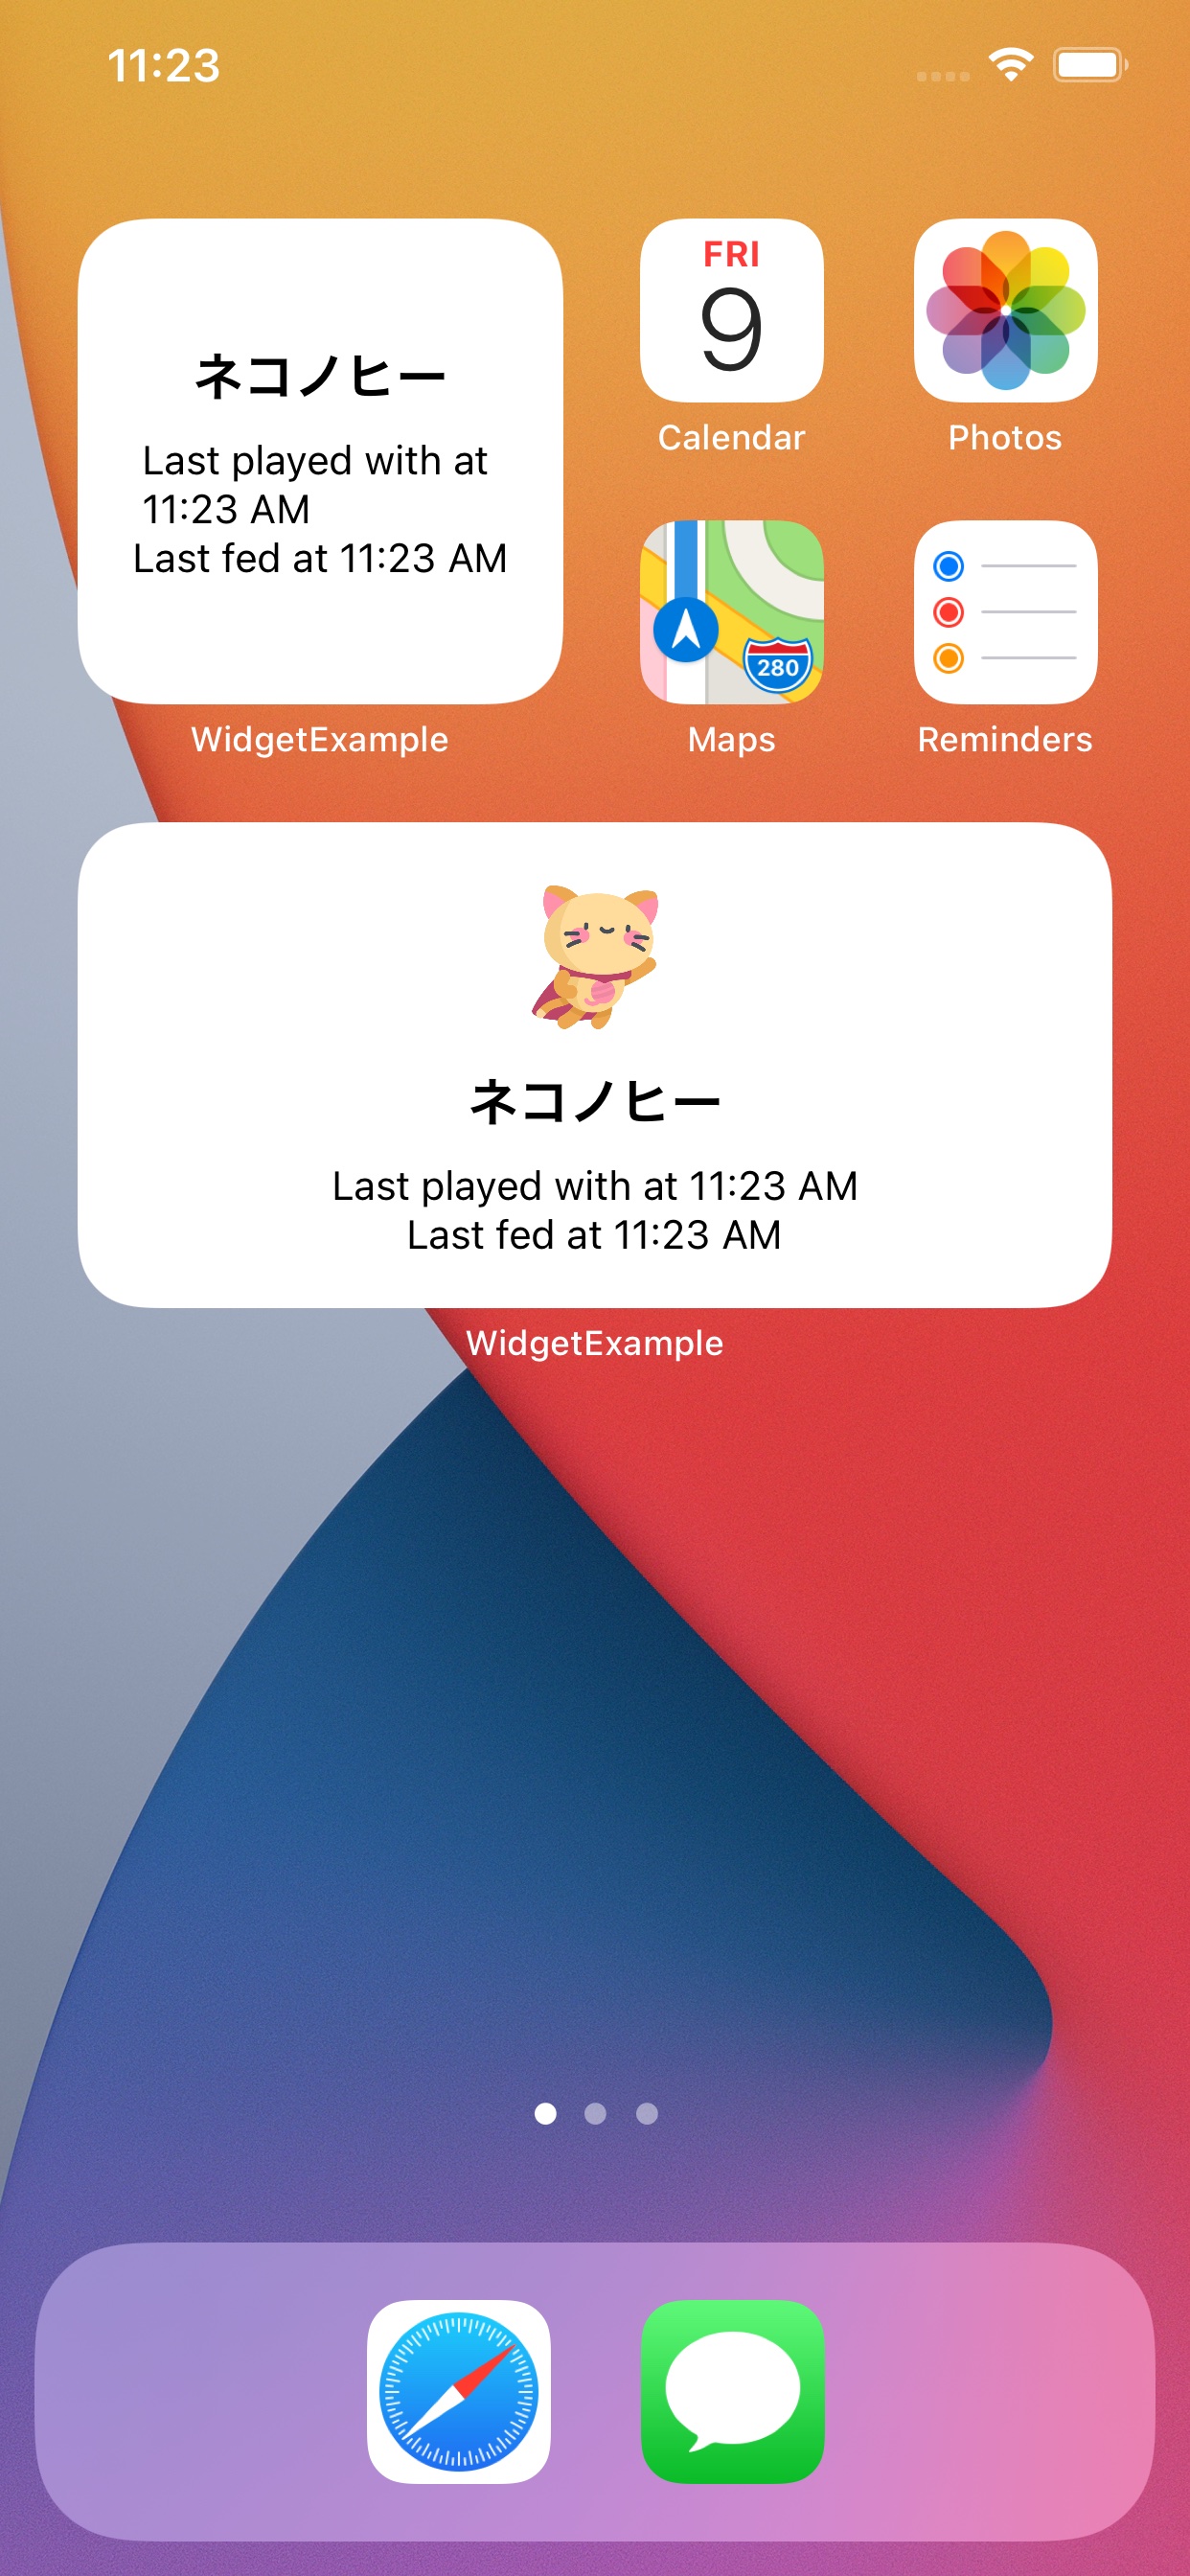
Now you can run the app on the simulator and add the widget you just designed to your screen.
Adding Configurable Widgets
If you've used a weather widget, you'll know that by long-pressing on the widget, users can configure it to display different cities. You can add this functionality using the Intents framework and Target.
Adding the Intents Program Target
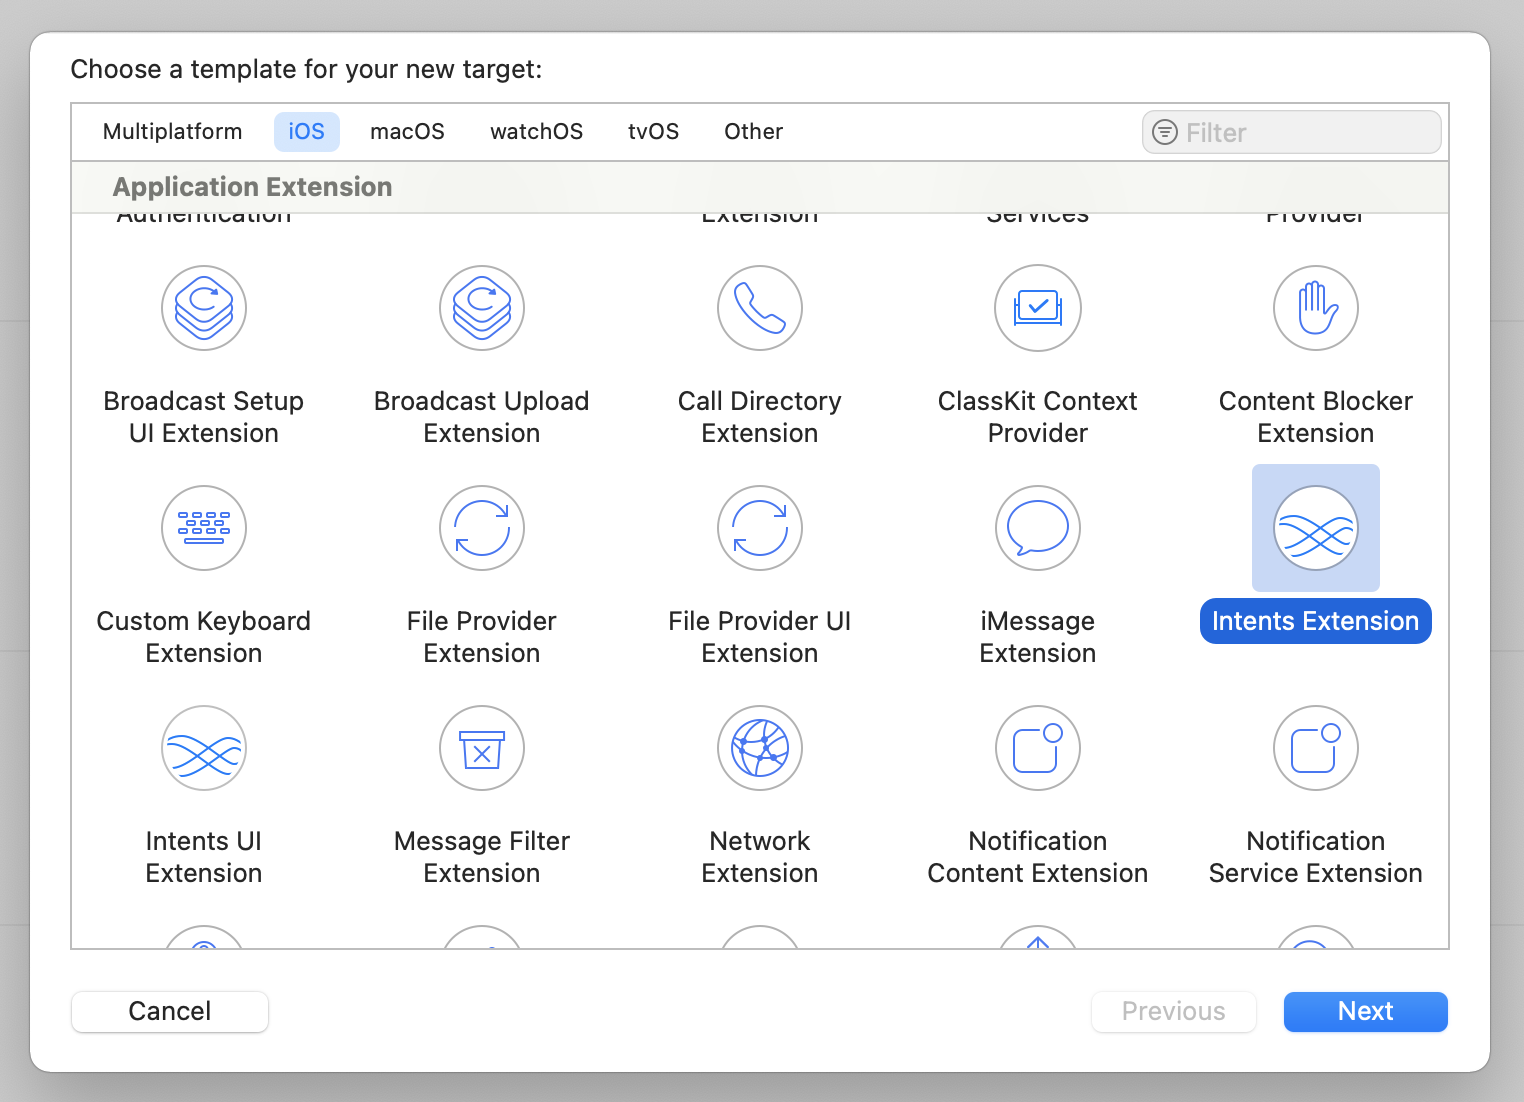
At this stage, UI elements are unnecessary, so uncheck the Include UI Extension option.
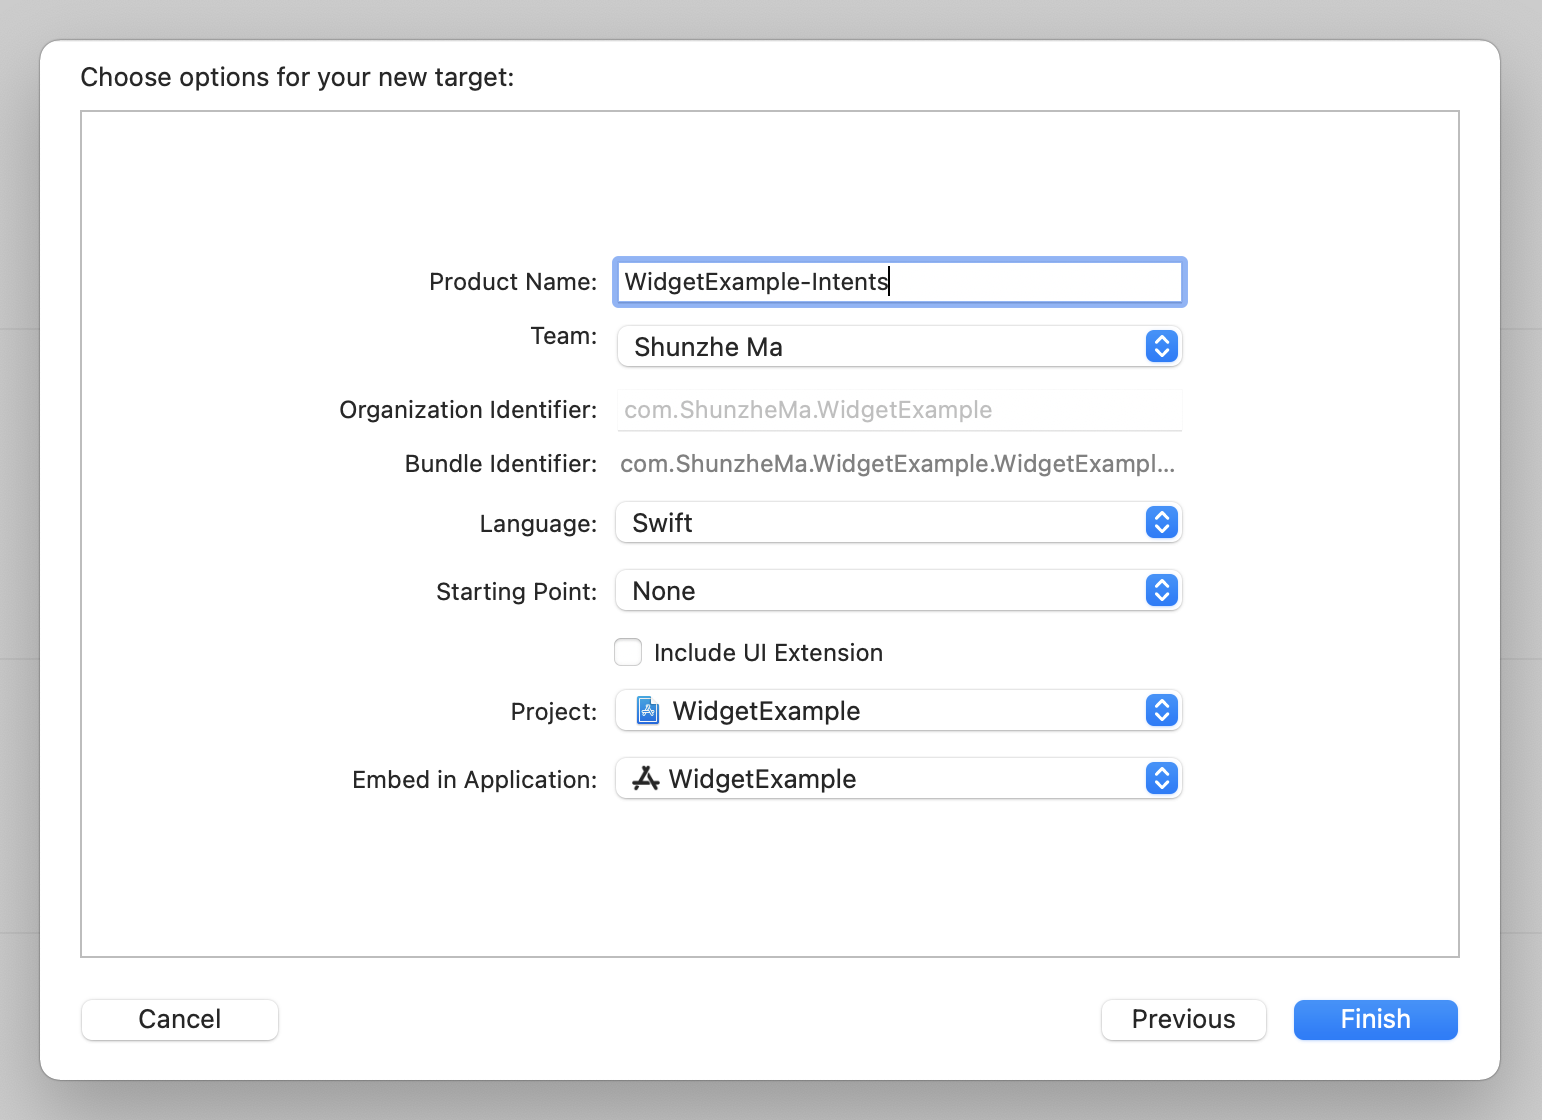
In the created Intents target page, find the section named Supported Intents. Create a new item named ConfigurationIntent. Now, you can name this to anything, but make sure to be consistent and use the same name for the upcoming steps.

Configuring .intentdefinition
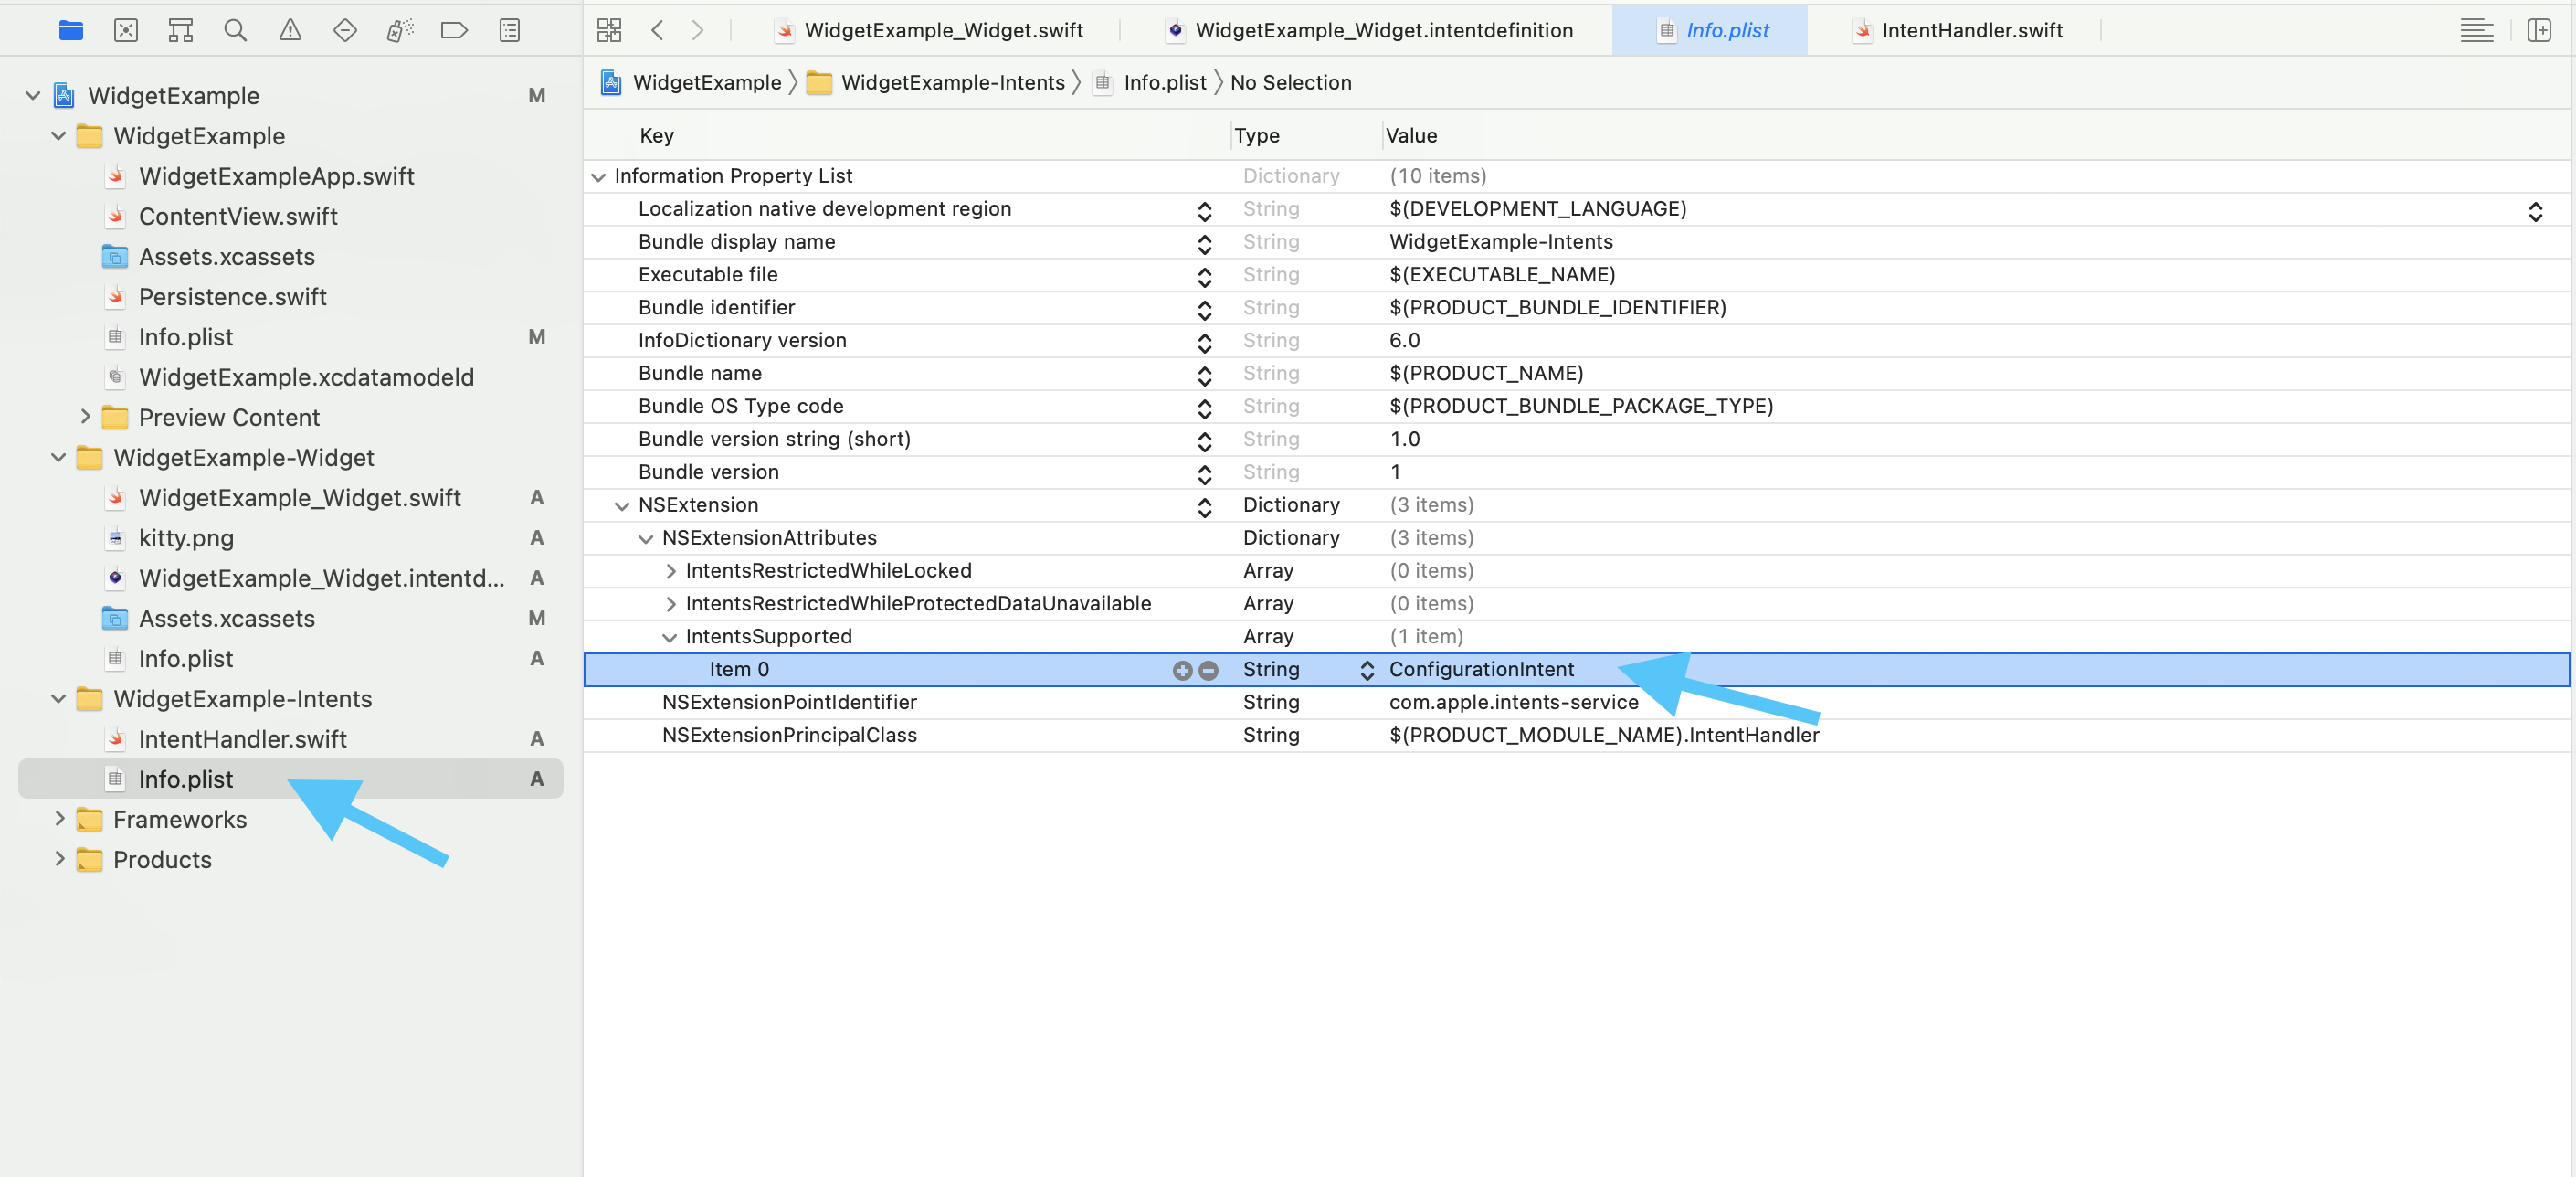
Next, in
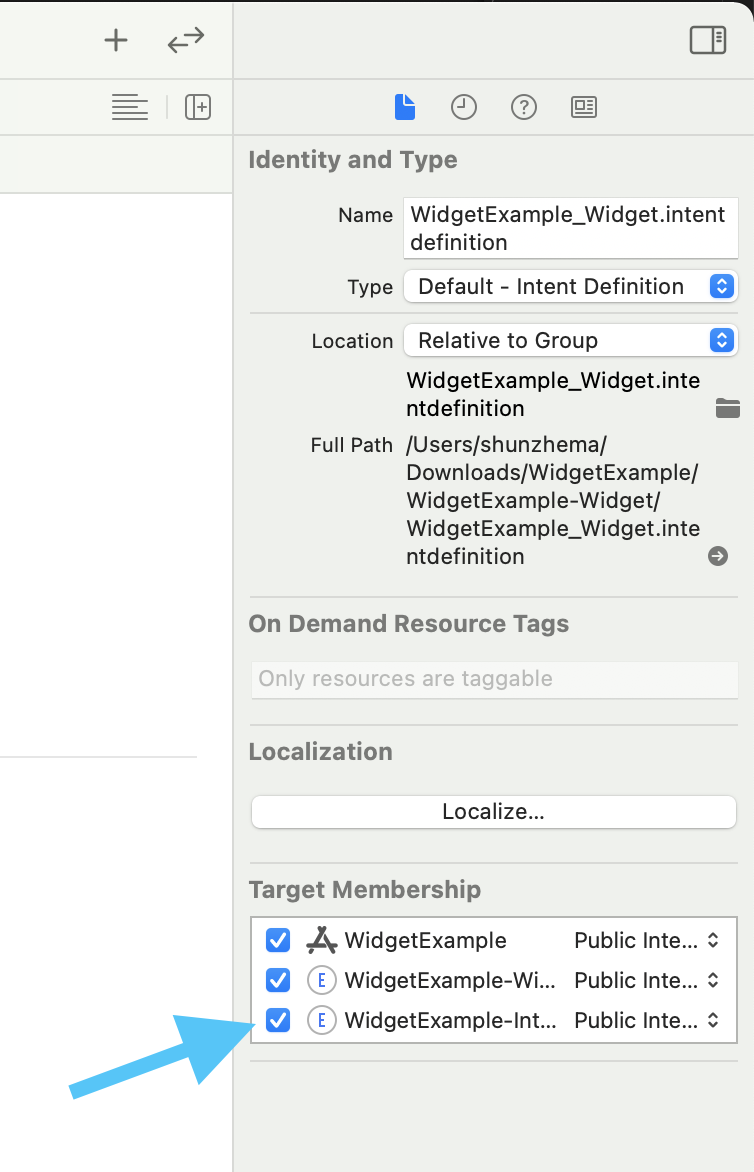
the previously created widget, add the newly created Intents extension as the intent target for the WidgetExample_Widget.intentdefinition file.
If you do not yet have an intentdefinition file, you can create one. Make sure to link the file to both the widget and the intent target.
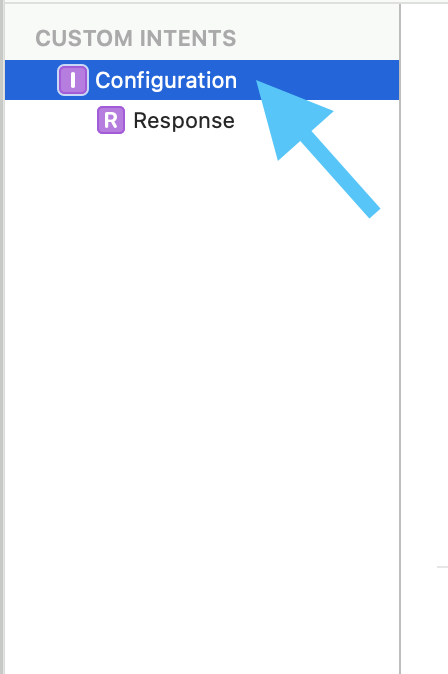
Click Configuration on the left side of the screen. If no configurations exists, tap the plus mark and create a new intent, and modify the name to be Configuration
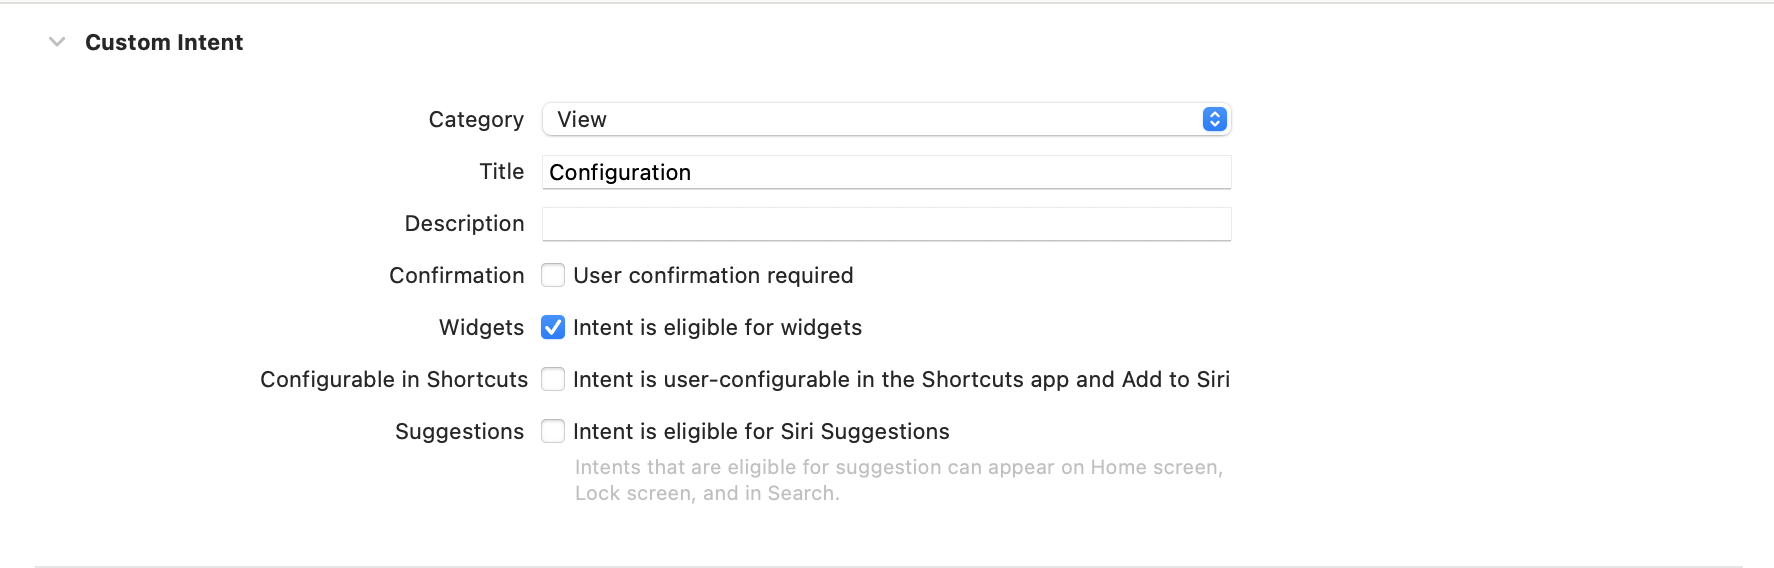
On the right side, ensure the configuration matches the following image.
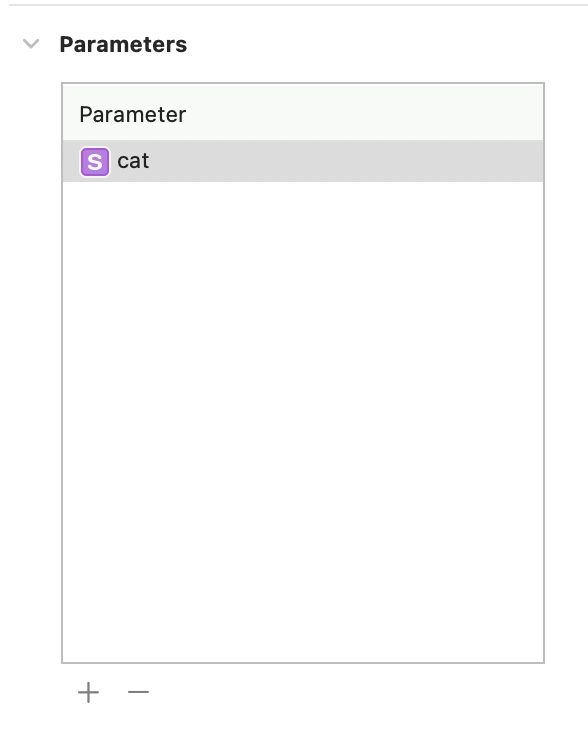
Next, add a new parameter named cat.
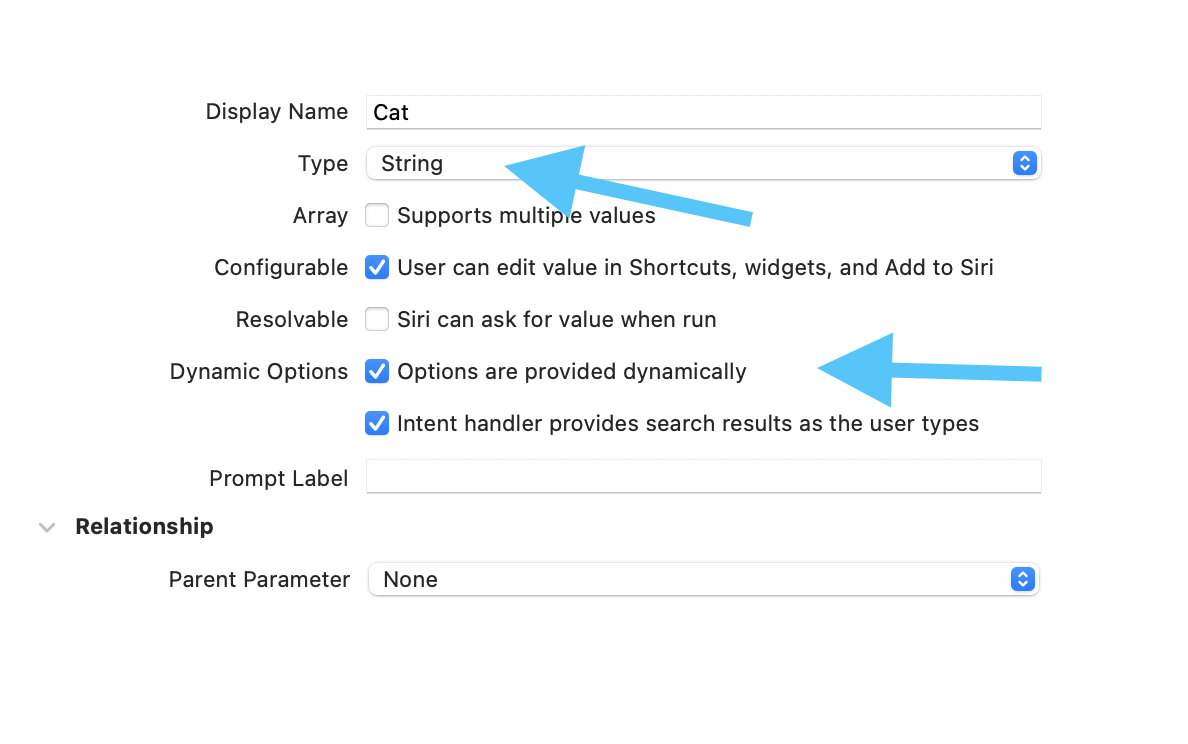
In the settings screen for the newly created cat parameter, select String for the Type to use as the identifier for the cat.
Configuring IntentHandler
Next, open the IntentHandler.swift file. This file provides options for users to configure the widget. In this example, the option will be the cat identifier.
Add the keyword ConfigurationIntentHandling next to the class type INExtension to allow Xcode to automatically display the next function names to add.
class IntentHandler: INExtension, ConfigurationIntentHandling {
    ...
}
In this example, the completed IntentHandler.swift file looks like this:
class IntentHandler: INExtension, ConfigurationIntentHandling {

    func provideCatOptionsCollection(for intent: ConfigurationIntent, searchTerm: String?, with completion: @escaping (INObjectCollection<NSString>?, Error?) -> Void) {
        let catIdentifiers: [NSString] = [
            "Neko No Hī",
            "Mugi",
            "Azuki"
        ]
        let allCatIdentifiers = INObjectCollection(items: catIdentifiers)
        completion(allCatIdentifiers, nil)
    }

    override func handler(for intent: INIntent) -> Any {
        // This is the default implementation. If you want different objects to handle different intents,
        // you can override this and return the handler you want for that particular intent.
        return self
    }
}
In the provideCatOptionsCollection function, you need to input a list of values. These values can actually be fetched from User Defaults, Core Data, or online. In this example, the values are hard-coded.
Using Core Data with App Extensions
Creating IntentTimelineProvider
In part 1 of this article, we used TimelineProvider. This time, we'll use IntentTimelineProvider.
If you already have a regular timeline provider, you should replace all the function headers (parameters).
The data structures between IntentTimelineProvider and TimelineProvider are almost identical. The difference is that you'll need to declare an additional typealias.
typealias Intent = ConfigurationIntent
Another difference is that each function receives an additional parameter representing the intent selection ConfigurationIntent.
struct CatProvider: IntentTimelineProvider {

    typealias Intent = ConfigurationIntent
    typealias Entry = CatEntry

    func placeholder(in context: Context) -> CatEntry {
        let entry = CatEntry(date: Date(), name: "", lastFed: Date(), lastPlayedWith: Date())
        return entry
    }

    func getSnapshot(for configuration: ConfigurationIntent, in context: Context, completion: @escaping (CatEntry) -> Void) {
        let entry = CatEntry(date: Date(), name: "Cat Name", lastFed: Date(), lastPlayedWith: Date())
        completion(entry)
    }

    func getTimeline(for configuration: ConfigurationIntent, in context: Context, completion: @escaping (Timeline<CatEntry>) -> Void) {
        let entry = CatEntry(date: Date(), name: configuration.cat ?? "", lastFed: Date(), lastPlayedWith: Date())
        let timeline = Timeline(entries: [entry], policy: .atEnd)
        completion(timeline)
    }
}
You can use the configuration.cat property to read the value of the option selected by the user.
let entry = CatEntry(date: Date(), name: configuration.cat ?? "", lastFed: Date(), lastPlayedWith: Date())
Updating CatWidget Code
In part 1, we used StaticConfiguration. In this part, we'll use IntentConfiguration (the name set in Supported Intents).
@main
struct CatWidget: Widget {

    var body: some WidgetConfiguration {
        IntentConfiguration(kind: "CatWidget", intent: ConfigurationIntent.self, provider: CatProvider()) { entry in
            CatWidgetView(entry: entry)
        }.configurationDisplayName("Cat")
        .description("See when you last fed or played with your cat.")
    }
}
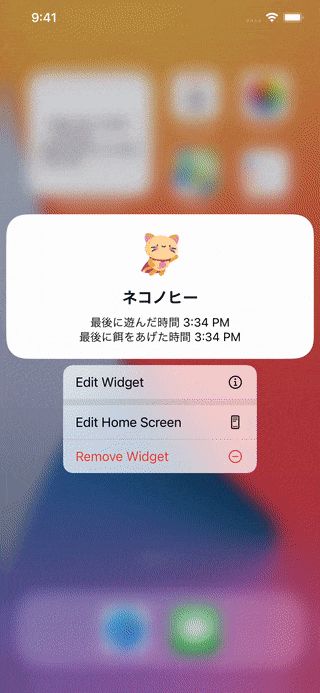
Now you can run the program on the simulator. By long-pressing the widget, you'll see an option named Edge Widget and you can change the cat name.
Reloading Widgets
If content in the widget changes, you can manually call the reload function for the widget from the main iOS application.
// import WidgetKit
WidgetCenter.shared.reloadAllTimelines()
For example, if you have a ToDo app and a widget displaying the number of ToDo items, you can reload the widget when the user completes or adds a ToDo item.
:relaxed: Twitter @MszPro
:sunny: Check out my list of publicly available Qiita articles by category.
